Empowering others: sharing experiences, ideas; offering creative solutions to common challenges.


Write to me at b.able2@yahoo.com
Showing posts with label activities of daily living. Show all posts

Saturday, August 18, 2012

Reader Inquiry

I know that I promised an entry devoted to swimming... and it's coming! Sometimes my readers send requests to me via my posted personal e-mail; and I do try to respond. With permission, I like to post your questions or dilemmas and even some of my tips/tricks for solving these inconveniences. Since I have permission, and the problem is a common one it is worthwhile to share. So, read on...

My reader wrote:

"It was great meeting you... Thanks for helping me out with those tricks and tips.I love your blog. There is so much information that I had questions to and you answered them for me.
I have a problem, I have a few pants with zippers on the left side. Because I'm missing my left forearm, it makes it impossible to wear these pants. Do you have any suggestions on how I can zip up the pants, without me tossing them in the trash?
And if you have any other tips, please send them to me. I'll keep checking your blog."

The suggestions:
Tell me more about the clothing... is there a button also? And does the fabric have any 'give' to it (stretchiness) vs being stiff like denim? Pants with a little lycra are easier because the fabric moves around our curves better.
     *If the pants have a button, you can use something called a "button extender" typically sold in the men's department because many shirts fit a man's body but the neck is often too tight. There is also a pant button extender on the market, typically sold on line. If you use the button extender, you could pre-button the pants, and pull them up.
     *To fasten the zipper, you can "hold" the bottom of the zipper by pushing up against a wall or a table. Run a string through the hole in the zipper pull and reach across your body with your right hand and pull the zipper up. Then tuck the string into your pants. It works really well if you use clear plastic thread---- it's strong and invisible if it works its way out of your waistband.
     *You can also use an assistive device called a zipper pull. It's a little hook with a long handle, typically about 6 inches long. It will help you to reach the zipper on the left side ofyour body with your right hand.

.

There is often more than one way to accomplish a task. You change the outcome by simply re-positioning your self or the objects being used.
Questions? Suggestions? Feel free to write to me at b.able2@yahoo.com

Thursday, May 24, 2012

Eve's Addiction Ad


I notice that this company has advertised on my blog. Although I have not (YET!!) puchased from them, they do carry some jewelry that I like. -You might enjoy it as well. This particular line is called Bali Design and it is made in ... you guessed it; BALI! I particularly like the silver and gold cuffs. The design is such that it has an opening and a hinge. There are no clasps to fasten! HALLELUJAH!!
One merely opens the hinged area and slides the bracelet on the forearm. This is wonderful for those of us with one hand, or those who are experiencing decreased fine motor abilities. Check out their website for yourself! This particular line is referred to as a Vintage Style Sterling Silver Cuff. http://www.evesaddiction.com/

Thursday, October 21, 2010

How Do You Do...Fastening a Watch?

Watches can be found in several different types of styles, with very different watchbands. Of course, I love a nice-looking watch! But there are two very distinct features that I seek in a watch. First, I need to be able to see the numbers on the face. I typically look for a watch with a large face or with easy to read numbers. Since I am a health care professional, I also like a second hand. The second feature I analyze is the clasp fastening. It has to be a type that I can do by myself and without taking alot of time. My favorite "work" watch is made by Invicta with a two-tone stainless steel hinged bracelet clasp. Unfortunately I recently broke one of the links. These are my other two favorites. One is a typical buckle style fastener  (the brown one) and the other (the gold watch) has a double-fold clasp. I can fasten both of these watches pretty easily using  the prosthesis (either the hook or the Adept terminal device) or with my residual limb. Let's look at how I do this task. Please remember that these are descriptions of how I accomplish tasks. There are many methods and strategies to accomplishing tasks. It is my hope that this blog will serve as a springboard of thought and empowerment to others to find successful techniques that will work for you, your clients or your loved ones who might be experiencing challenges. So let's check this out...
Without a prosthesis:
First the traditional buckle style watchband:
Positioning is important for my success. I wear my watch on my left wrist and will typically support  my left forearm on my left thigh to stabilize the area so that I can best maneuver my residual limb. I 'grasp' the watch with the crook of my right elbow and position the watch on my wrist.

Then I manipulate the band so that I will be able to feed the end into the buckle.


Once it is through the buckle, I pull it the remainder of the way using the terminal end of my residual limb and my left thigh.
I use my residual limb  to push the strap though the placement holders once through the buckle


so the watch is completely fastened.

And now the double hinge metallic strap:
Again, positioning is a key to sucess. I drape the watch over my wrist using my residual limb. My left forearm is supported on my thigh to stabilize my arm during the task.
I align the strap onto the prongs of the clasp
and use my residual limb to push the clasp and hook it together

Then I push the second hinge over the first in the same fashion

And it's on!

With a prosthesis:
The traditional buckle watchstrap:
I drape the watch on my wrist, pinch the strap, push and then pinch and pull it to get it through the buckle.


And it's on!
And finally the double hinge watchstrap:
I grasp the watch with the terminal device and position it on my wrist.

I line up the hooks on the clasp and then pinch

Then I fold over the second hinge and repeat the process
And the watch is on.

I must confess that photographs give the appearance of simplicity. I have spent many hours practicing these techniques, beginning when I was very young. Don't be discouraged... any  skill worth acquiring is worth working toward with diligence! And being maximally functionally independent is a worthy goal.

Next to be published will be buttoning the cuff button ... Check back next week!!
In the meantime, be well, be blessed.

Tuesday, October 12, 2010

How Do You Do.... Gloves?

Let's talk about something new.... We cleaned closets this week-end in anticipation of the cold weather approaching quickly! Temperatures here in New England are expected to plummet with the high only reaching about 50 degrees. I'll need to don a hat and gloves for our nightly walk. I don't know about you, but it can be costly buying gloves. Good gloves typically are priced beginning at $20; more for fitted or lined leather; less for the cheapies. In any case, I don't like paying $20 for the use of only one glove!! Especially since I'm likely to lose the left (the one I need and use) and am stuck with the right! (Anyone need a right hand glove? I do have a few!) There have been times when friends or family will pass on to me the left hand glove when they have misplaced the right in the pair. -One glove is not usually helpful for a two-handed person, but can be a blessing to me!

Over the years I've discovered a few helpful hints to keep my hand warm during chilly weather.... my favorite of course is to hold hands with my husband. But there are times when one needs a glove or a mitten. The least expensive option is the 'magic glove'. These are sold in a universal pair, meaning that it's a set of two and that both gloves fit either hand. They are available in a wide assortment of colors and sizes for both adults and children. The benfits are that they are cheap and useable for either hand. The drawback.... they are cheap and not overly warm. One might have to wear a few layers of magic gloves to have a warm hand.

Another solution is the knitted woolen glove or a fleece glove. These are sold in fitted pairs and are warmer than the magic gloves. Since they are fitted and are hand-specific, the problem is that a one-handed person cannot use the other glove.... unless you turn it inside out.

Granted, it's not pretty, but when it comes right down to it function wins over form for staying warm. I'd rather look like a goof and be toasty warm  than freezing and  frost-bitten.

 When I'm out on my snow shoes I like to wear my heavy fleece mittens, often with a pair of insulated glove liners. (True, I don't really wear the pair; I only use the liner on my hand; my prosthesis does not need the extra insulation!) In any case, the mitten fits nicely over my Adept terminal device, don''t you think???

Lastly, and probably most special of all is the pair of fingerless gloves that my friend Hermine knitted especially for me. They keep the palm warm and look chic. Of course, I have the pair to add symmetry!

Monday, September 13, 2010

How Do You Do... Cooking 201?

My husband loves to eat and I love to cook for him. Since I was chopping, mixing ingredients and indulging in a stovetop creation, we thought it was a great time to seize the moment and add to the blog. So, thanks to my husband Mike and his camera, we have the next edition to How Do You Do... Cooking! I also want to take a moment to speak about learning to cook. Like everyone else from my generation, I took the obligatory Home Ec in 7th and 8th grades. Unfortunately, Mrs. P's rigid lessons did not unleash any culinary desires -or talents- in my heart. That being said, I had a wonderful Chemistry teacher in the 10th grade (Mr. B!) who ignited my interest in creating and encouraged my tendency to use my prosthesis in inventive ways.
-The hook does a wonderful job holding test tubes over a bunson burner. Tonight I am making a pasta primavera with shrimp. I admit it; I'm cleaning out the refrigerator but it really did turn out good!
Before we get started, let's take a peak at some of my favorite cooking tools (though we may not use all of them in today's edition):
my non-skid mat (purchased at HomeGoods)
white anti-microbial cutting boards (Ikea)
one-handed pizza roller (Pampered Chef; used to cut more than pizza)

one-handed pie crust roller (ditto)
double-blade scissors/spoon (a gift!)
Kitchen Aid grater with lid (HomeGoods)
egg yolk separator (Pampered Chef)
bamboo tongs (Pampered Chef)
food pick (Pampered Chef)
And the cooking begins!
I place the non-skid mat on the counter with my cutting board on top of it. This keeps the cutting board from sliding around while I'm trying to chop. Then I use my forearm to stabilize the onion to cut off the ends...
With the prosthesis:
or without:
Then I peel the onion:

and then chop it:
Without a prosthesis, this is how I do it...


I am using my residual limb to push down on the blade. -It does look a little dangerous, but I am very cautious (and at this point in my life) pretty quick.
Add it to the saute pan -with olive oil, of course (and garlic, spices...)


I love the handle on my cutting boards. It's just big enough to slide my residual arm in place to grab the board. Now it's time to chop the tomato. Tomatoes are typically softer and can be squishy. -It's definitely an advantage to use my Adept over the hook with this task!

and certainly more difficult (but possible!) without...


It's even easier with the food pick:

Chop, chop, chop!!!!

Another way to chop is the double-blade scissors device:

And add it  to the saute pan:

Now to make the pasta. First, fill the pot with water. It's much easier to keep the pot on the counter if possible, rather than filling it in the sink and lifting it up onto the counter. I place it on a cutting board so I can slide the full pot over to the sink and then onto the stove.


Same steps without a prosthesis: slide the full pot on the counter and place the pot on the stove.
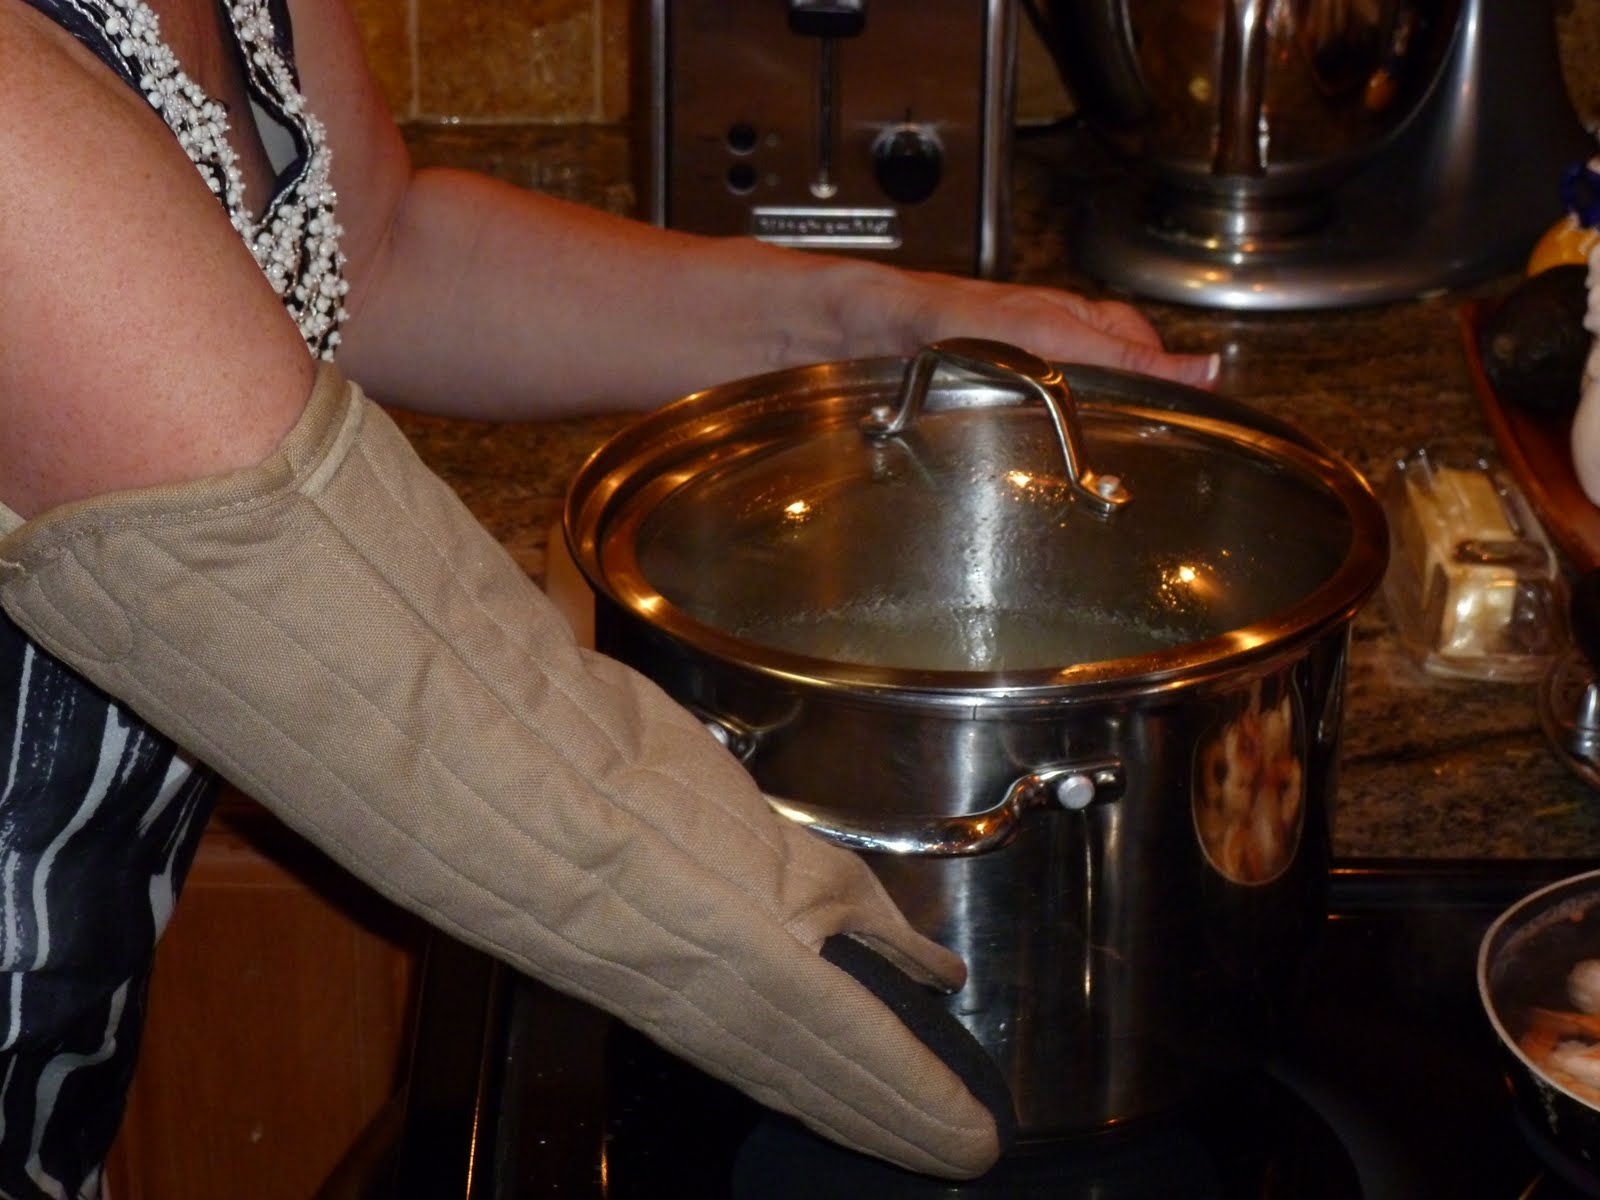
The pasta is done... To move the hot pot to the sink I keep the cover on and gently move it onto the cuttingboard and slide it over to the sink.

Without a prosthesis, I wear an oven mitt on my residual limb:

My colander has expandable handles that stretch over the sink and I dump the hot pasta and water into it...
Dinner is almost ready, but I need to open a jar of seasoning to add to my concoction


and then peel the shrimp...


I use the tongs for serving and hold my plate in my prosthesis  -or place it alongside the serving dish...


Bon appetit!
We'll have alot of dishes to wash in the next edition...